实用工具来了,存量 OpenAPI 批量转化为 MCP Server
Release Time 2025-04-11
将存量 OpenAPI 批量转化为 MCP Server,这是 Higress 最新开源的能力,助力开发者们高效构建 MCP Server。[1]
01 OpenAPI 的相关概念
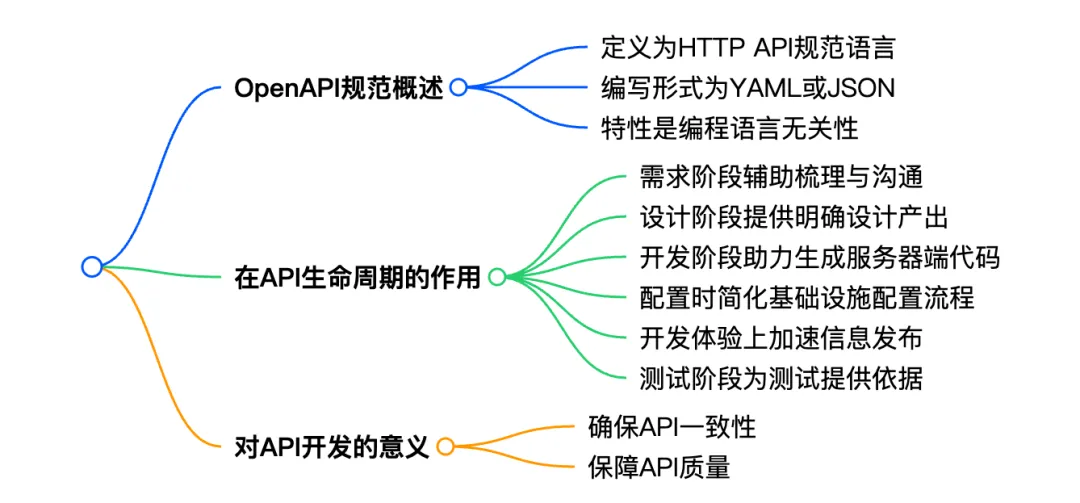
OpenAPI 采用 YAML 或 JSON 编写,定义了一个与语言无关的 HTTP API 接口,为 API 生命周期各阶段提供统一的信息传递方式。而 API 允许开发者在无须访问源代码的情况下,就可以发现并使用相应的服务。例如,一个社交 APP,想获取双方的地理位置信息,无须自建一个高德地图,也无须获取高德地图源码,而是通过高德地图的 API 接口,即可获得其地理位置信息的功能。
经典互联网应用,例如高德、支付宝等均以开放平台的方式对外提供 API 服务;公共云服务,例如阿里云通过 OpenAPI Explorer 向用户提供 API 服务,使得开发者可以通过这些应用程序接口来管理云上资源、数据和服务等内容。再例如人工智能大模型,通义、DeepSeek、OpenAI 均以 API 的方式,对外提供大模型的调用服务。这些 API 均遵循 OpenAPI 规范,有了规范,协作才会高效。

02 将存量 OpenAPI 转化为 MCP Server 的常规做法
MCP 是允许 LLM 能够通过标准化的方式,访问外部资源、数据和服务。将存量 OpenAPI 转化为 MCP Server,是一种利旧,是实现经济效益的高效路径,目的是使自身的服务能被外部的 AI 应用进行调用,从而提升存量服务的价值。仍然以高德地图为例,高德提供将存量的 OpenAPI 服务,例如 IP 定位、地理编码转化为 MCP Server,就可以让外部应用调用高德地图的能力,从而提升服务的活跃度。
虽然 MCP 已经大幅降低了大模型应用访问和调用外部资源、数据和服务的复杂度,但若您将复用存量基础设施作为 MCP 的开发策略,那么将面对一个新的问题,即存量 OpenAPI 转化为 MCP Server 是一个“重复的体力活”,且还要进行日常维护,包括接口的更新、服务器稳定性保障等。MCP 提供了 TypeScript、Java 等 SDK 工具包,用于开发 MCP Server,将存量 OpenAPI 对外通过 MCP 协议暴露成普通的 HTTP 服务,这个过程包括:[1]
- 读取并解析存量 OpenAPI 的文档,提取出其中的关键信息,如 API 路径、请求方法、请求参数、响应格式等。
- 按照 MCP 协议的规范,转化成新的描述,包括 Tool 的作用描述和 Tool 的参数描述,以 tool/list 结果,返回给客户端。
- 当 MCP Client 要调用 MCP Server 的时候,将 tool/call 的 Json RPC 请求解析出来,通过配置好的参数映射信息、Path、后端地址等信息,生成后端的 HTTP 调用请求,并进行调用。调用完成后,再将后端的调用结果包装,供标准的 tool/call 接口调用返回结果。
03 批量转化 OpenAPI 至 MCP Server
3.1 安装
go install github.com/higress-group/openapi-to-mcpserver/cmd/openapi-to-mcp@latest3.2 使用
openapi-to-mcp --input path/to/openapi.json --output path/to/mcp-config.yaml说明
--input:OpenAPI 规范文件的路径(JSON 或 YAML 格式),必填项。--output:输出的 MCP 配置文件的路径(YAML 格式),必填项。--server-name:MCP 服务器的名称,默认值为 “openapi-server”。--tool-prefix:工具名称的前缀,默认值为空。--format:输出格式(yaml 或 json),默认值为 “yaml”。--validate:是否验证 OpenAPI 规范,默认值为 false。--template:用于修补输出的模板文件的路径,默认值为空。
3.3 示例
openapi-to-mcp --input petstore.json --output petstore-mcp.yaml --server-name petstore这个示例将 petstore.json 文件转换为 petstore-mcp.yaml 文件,并将 MCP 服务器的名称设置为 petstore。
以下是完整示例。
a. 从一个 OpenAPI 规范(petstore.json)开始:
{ "openapi": "3.0.0", "info": { "version": "1.0.0", "title": "Swagger Petstore", "description": "A sample API that uses a petstore as an example to demonstrate features in the OpenAPI 3.0 specification" }, "servers": [ { "url": "http://petstore.swagger.io/v1" } ], "paths": { "/pets": { "get": { "summary": "List all pets", "operationId": "listPets", "parameters": [ { "name": "limit", "in": "query", "description": "How many items to return at one time (max 100)", "required": false, "schema": { "type": "integer", "format": "int32" } } ], "responses": { "200": { "description": "A paged array of pets", "content": { "application/json": { "schema": { "type": "object", "properties": { "pets": { "type": "array", "items": { "type": "object", "properties": { "id": { "type": "integer", "description": "Unique identifier for the pet" }, "name": { "type": "string", "description": "Name of the pet" }, "tag": { "type": "string", "description": "Tag of the pet" } } } }, "nextPage": { "type": "string", "description": "URL to get the next page of pets" } } } } } } } }, "post": { "summary": "Create a pet", "operationId": "createPets", "requestBody": { "description": "Pet to add to the store", "required": true, "content": { "application/json": { "schema": { "type": "object", "required": ["name"], "properties": { "name": { "type": "string", "description": "Name of the pet" }, "tag": { "type": "string", "description": "Tag of the pet" } } } } } }, "responses": { "201": { "description": "Null response" } } } }, "/pets/{petId}": { "get": { "summary": "Info for a specific pet", "operationId": "showPetById", "parameters": [ { "name": "petId", "in": "path", "required": true, "description": "The id of the pet to retrieve", "schema": { "type": "string" } } ], "responses": { "200": { "description": "Expected response to a valid request", "content": { "application/json": { "schema": { "type": "object", "properties": { "id": { "type": "integer", "description": "Unique identifier for the pet" }, "name": { "type": "string", "description": "Name of the pet" }, "tag": { "type": "string", "description": "Tag of the pet" } } } } } } } } } }}b. 将其转换为 Higress REST-to-MCP 配置:
openapi-to-mcp --input petstore.json --output petstore-mcp.yaml --server-name petstorec. 生成 petstore-mcp.yaml 文件:
server:  name: petstoretools:  - name: showPetById    description: Info for a specific pet    args:      - name: petId        description: The id of the pet to retrieve        type: string        required: true        position: path    requestTemplate:      url: /pets/{petId}      method: GET    responseTemplate:      prependBody: |        # API Response Information
        Below is the response from an API call. To help you understand the data, I've provided:
        1. A detailed description of all fields in the response structure        2. The complete API response
        ## Response Structure
        > Content-Type: application/json
        - **id**: Unique identifier for the pet (Type: integer)        - **name**: Name of the pet (Type: string)        - **tag**: Tag of the pet (Type: string)
        ## Original Response
  - name: createPets    description: Create a pet    args:      - name: name        description: Name of the pet        type: string        required: true        position: body      - name: tag        description: Tag of the pet        type: string        position: body    requestTemplate:      url: /pets      method: POST      headers:        - key: Content-Type          value: application/json    responseTemplate: {}
  - name: listPets    description: List all pets    args:      - name: limit        description: How many items to return at one time (max 100)        type: integer        position: query    requestTemplate:      url: /pets      method: GET    responseTemplate:      prependBody: |        # API Response Information
        Below is the response from an API call. To help you understand the data, I've provided:
        1. A detailed description of all fields in the response structure        2. The complete API response
        ## Response Structure
        > Content-Type: application/json
        - **pets**:  (Type: array)          - **pets[].id**: Unique identifier for the pet (Type: integer)          - **pets[].name**: Name of the pet (Type: string)          - **pets[].tag**: Tag of the pet (Type: string)        - **nextPage**: URL to get the next page of pets (Type: string)
        ## Original Response
注意,该工具会根据每个参数在 OpenAPI 规范中的位置自动设置其位置字段:
<font style="color:rgba(0, 0, 0, 0.85) !important;">petId</font>参数被设置为<font style="color:rgba(0, 0, 0, 0.85) !important;">position: path</font>(位置:路径),因为在 OpenAPI 规范中它被定义为<font style="color:rgba(0, 0, 0, 0.85) !important;">in: path</font>(位于路径中)。<font style="color:rgba(0, 0, 0, 0.85) !important;">limit</font>参数被设置为<font style="color:rgba(0, 0, 0, 0.85) !important;">position: query</font>(位置:查询参数),因为在 OpenAPI 规范中它被定义为<font style="color:rgba(0, 0, 0, 0.85) !important;">in: query</font>(位于查询参数中)。- 请求体属性(
<font style="color:rgba(0, 0, 0, 0.85) !important;">name</font>和<font style="color:rgba(0, 0, 0, 0.85) !important;">tag</font>)被设置为<font style="color:rgba(0, 0, 0, 0.85) !important;">position: body</font>(位置:请求体)。
MCP 服务器在发起 API 请求时,会在正确的位置自动处理这些参数。有关如何将此配置与 Higress REST-to-MCP 结合使用的更多信息,请参考 Higress REST-to-MCP 文档。[2]
3.4 功能
- 将 OpenAPI 路径转换为 MCP 工具。
- 支持 JSON 和 YAML 格式的 OpenAPI 规范。
- 生成包含服务器和工具定义的 MCP 配置。
- 保留参数描述和类型。
- 根据 OpenAPI 参数位置自动设置参数位置(路径、查询、头部、Cookie、请求体)。
- 处理路径、查询、头部、Cookie 和请求体参数。
- 生成带有字段描述和改进格式的响应模板,以便大语言模型(LLM)理解。
- 可选的 OpenAPI 规范验证(默认禁用)。
3.5 配置 MCP Server 插件
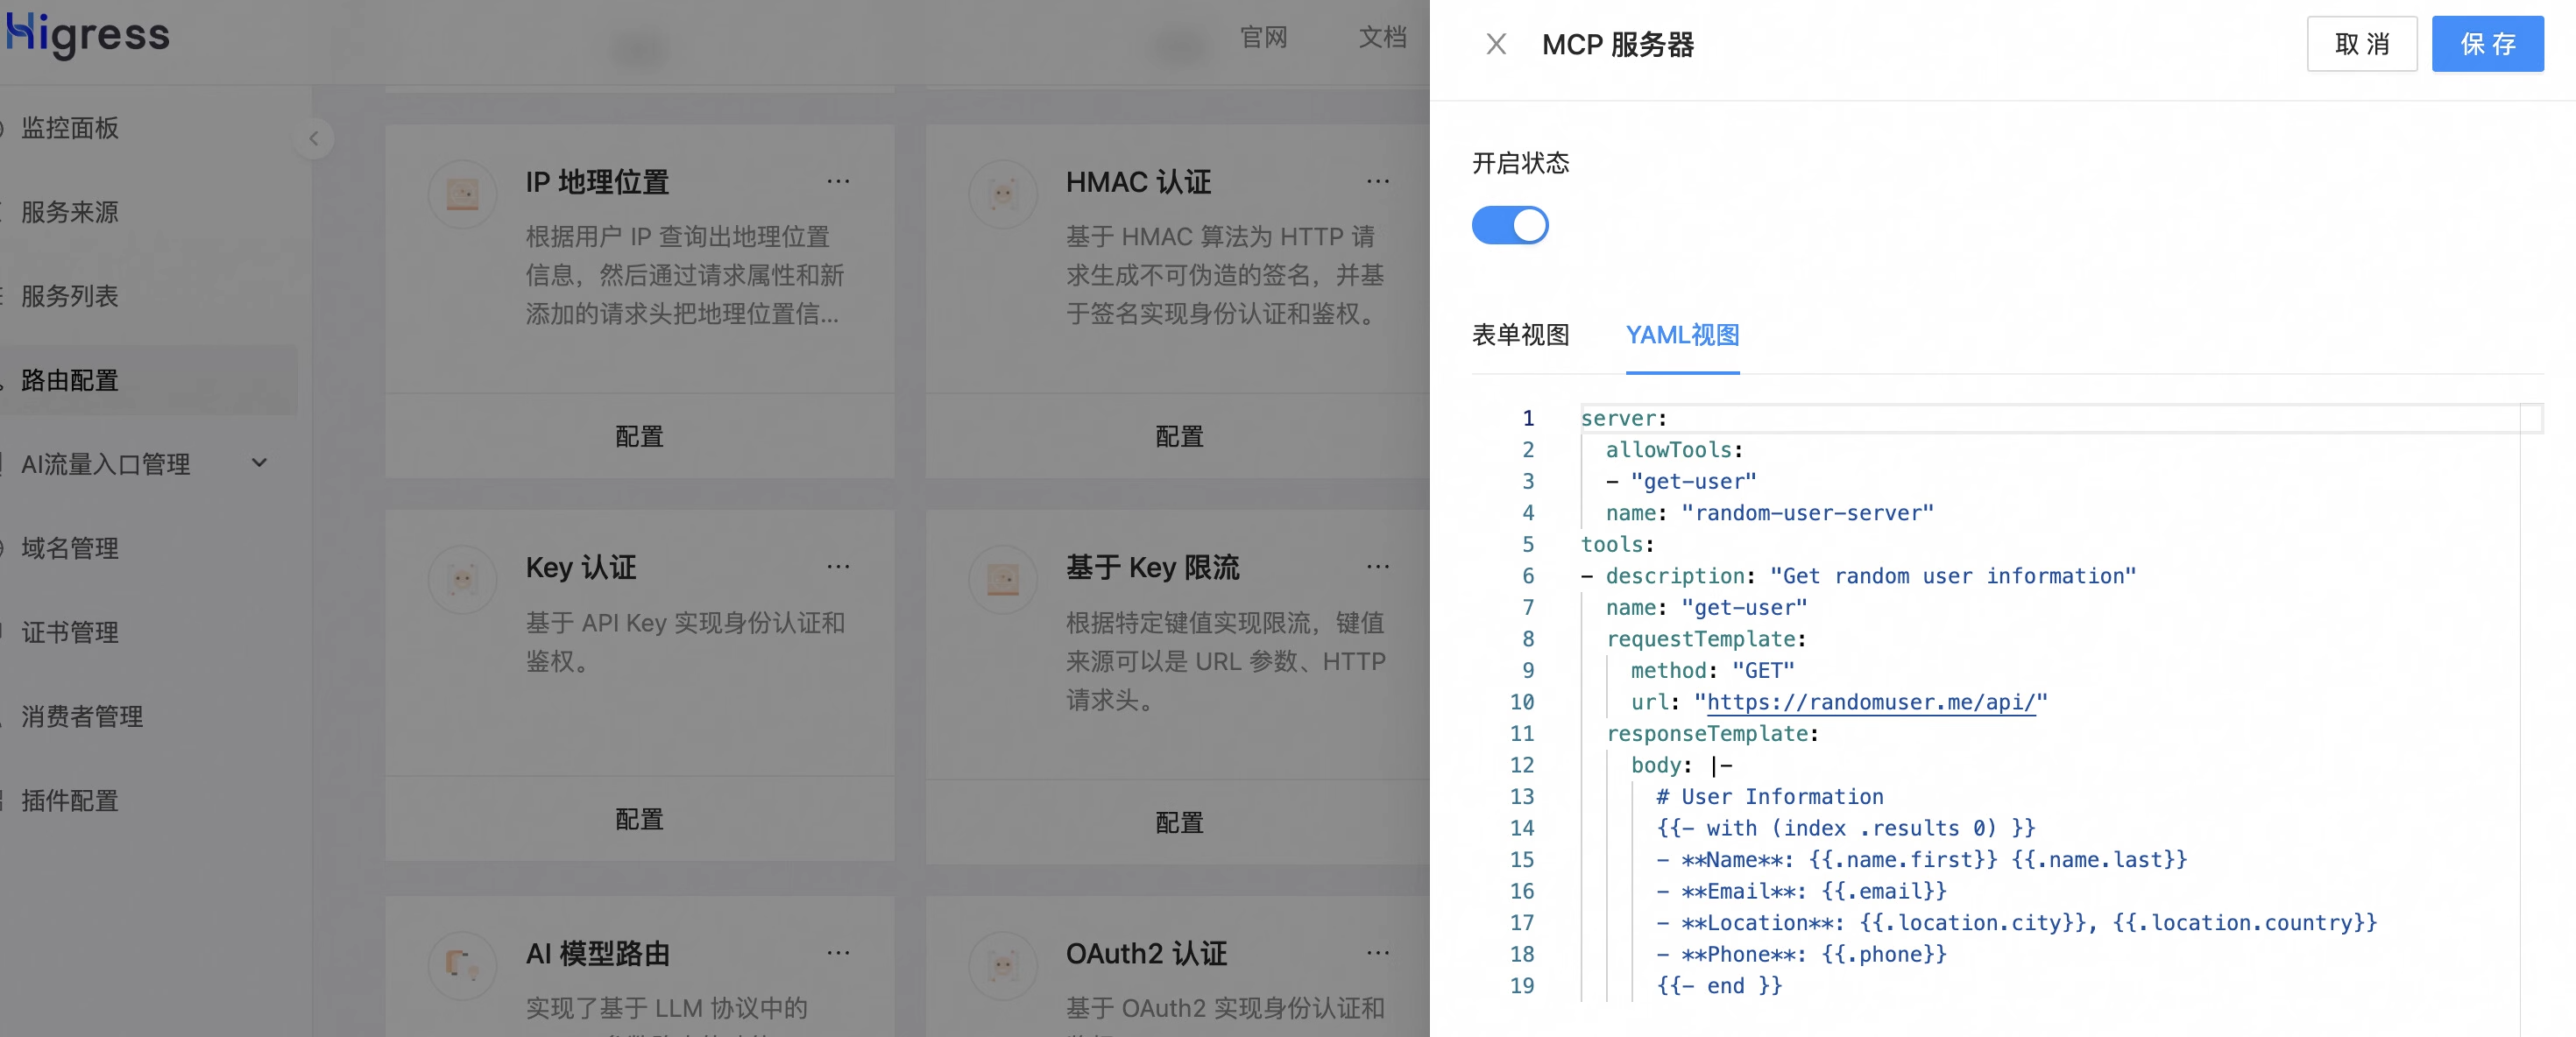
接下来我们将生成的文件导入 Higress 控制台,并添加 MCP Server 插件并进行配置,就可以将其与 Higress 一起使用。

插件配置示例:
server: name: "random-user-server"tools:- description: "Get random user information" name: "get-user" requestTemplate: method: "GET" url: "https://randomuser.me/api/" responseTemplate: body: |- # User Information {{- with (index .results 0) }} - **Name**: {{.name.first}} {{.name.last}} - **Email**: {{.email}} - **Location**: {{.location.city}}, {{.location.country}} - **Phone**: {{.phone}} {{- end }}注意: 对于2025 - 03 - 26 MCP streamable HTTP协议,可以直接使用此插件,无需全局 ConfigMap 配置。
3.6 调用 MCP Server
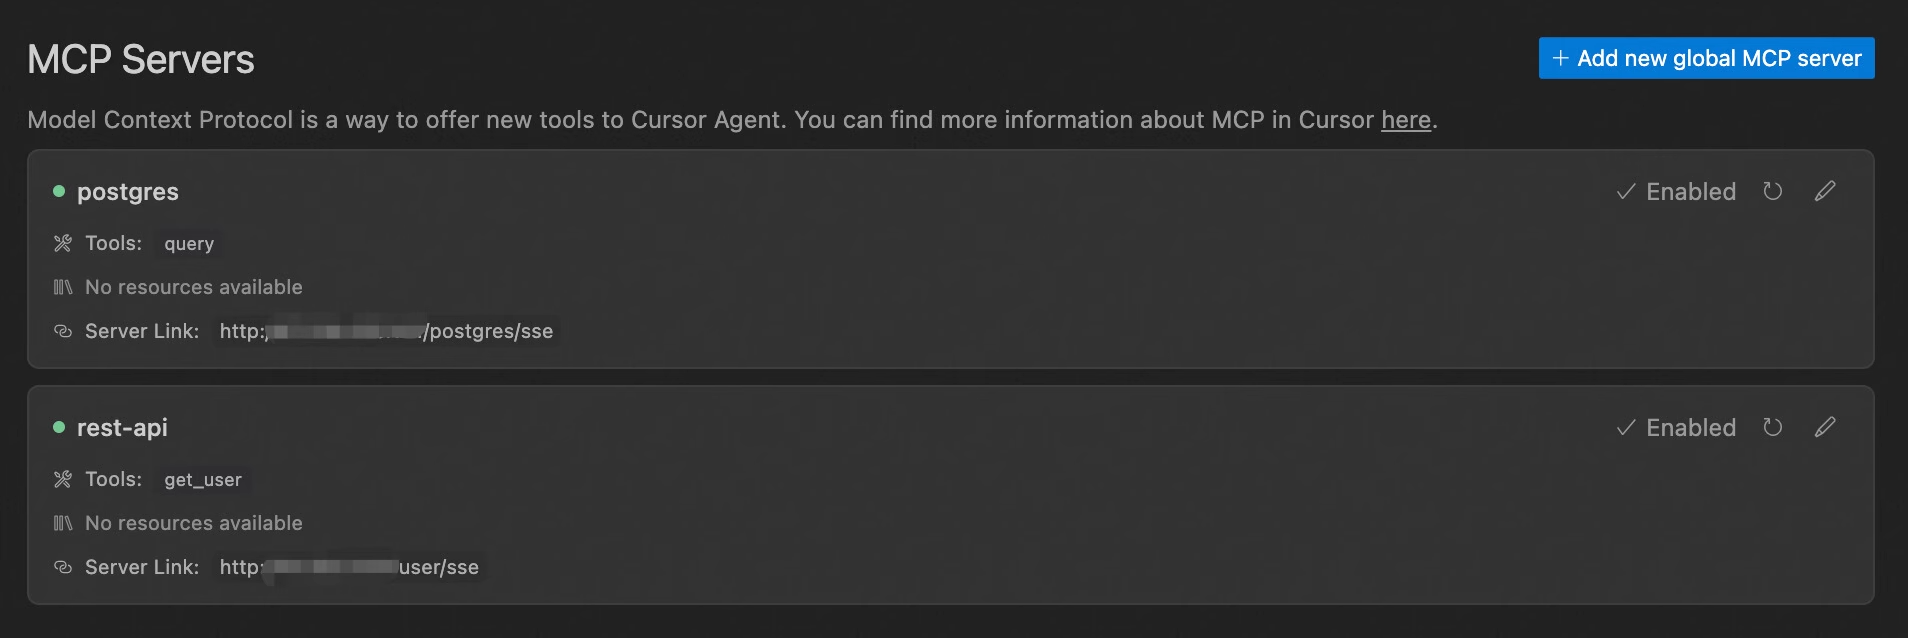
在 AI Agent 中配置 MCP Server 的 SSE 连接,以 Cursor 为例:
- 数据库类型的 MCP Server:使用 ConfigMap 中配置的 path + sse_path_suffix
- REST API 类型的 MCP Server:使用控制台配置的路由 path + sse_path_suffix
"mcpServers": { "postgres": { "url": "http://your-higress-address/postgres/sse" }, "rest-api": { "url": "http://your-higress-address/user/sse" }Cursor 中配置完成:

通过 MCP Server,您可以快速为 AI Agent 添加各种数据源支持,提高开发效率。任何 REST API 都可以通过简单的配置转换为 MCP Server,无需编写额外的代码。
04 对 MCP Server 进行配置调优
在前面的章节中,我们已经了解了OpenAPI to MCP工具如何帮助我们快速将现有API转换为AI助手可调用的工具。这种自动化转换极大地提高了开发效率,让我们能够在几分钟内完成原本需要数小时甚至数天的工作。
然而,自动生成的配置虽然功能完整,但往往不够精细。特别是当API返回复杂数据结构时,如果不对配置进行人工调优,可能会导致大型语言模型(LLM)对数据的理解不够准确,从而影响用户体验。
4.1 为什么需要调优MCP配置?
自动生成的MCP配置通常会包含API返回的所有字段,并以扁平的方式呈现。这在处理简单API时可能足够,但对于返回大量嵌套数据的复杂API,会带来几个问题:
- 信息过载:LLM的上下文窗口有限,过多无关信息会稀释重要内容
- 结构不清:复杂的嵌套关系在扁平描述中容易丢失
- 缺乏语义:技术代码和专业术语未经转换,难以被LLM正确理解
- 幻觉风险:面对不熟悉的数据结构,LLM可能产生错误推断
通过人工调优MCP配置,我们可以显著提升LLM对API返回数据的理解能力,减少错误解读和幻觉,从而为用户提供更准确、更有价值的回答。
4.2 调优案例:电商产品搜索API
让我们通过一个具体案例来说明MCP配置调优的重要性。假设我们有一个电商平台的产品搜索API,它返回包含大量技术细节的复杂产品信息。
4.2.1 自动生成的基础配置
使用OpenAPI to MCP工具自动生成的配置可能如下所示:
server:  name: ecommerce-apitools:  - name: searchProducts    description: "Search for products in the e-commerce platform"    args:      - name: query        description: "Search query string"        type: string        required: true      - name: category        description: "Product category"        type: string        required: false      - name: limit        description: "Maximum number of results to return"        type: integer        default: 10    requestTemplate:      url: "https://api.example.com/products/search"      method: GET      argsToUrlParam: true    responseTemplate:      prependBody: |        # Search Results
        Below is the API response with these fields:
        - **success**: Boolean indicating if the request was successful        - **total**: Total number of matching products        - **page**: Current page number        - **pageSize**: Number of items per page        - **products**: Array of product objects with the following fields:          - **id**: Product unique identifier          - **name**: Product name          - **description**: Product description          - **price**: Product price          - **compareAtPrice**: Original price before discount          - **currency**: Currency code (e.g., USD, EUR)          - **availability**: Product availability status          - **metadata**: Technical metadata          - **attributes**: Product attributes          - **variants**: Product variations          - **images**: Product images          - **categories**: Categories the product belongs to          - **tags**: Product tags          - **brand**: Product brand information          - **shipping**: Shipping information          - **ratings**: Product ratings and reviews
        Original response:
当LLM接收到这种配置下的API响应时,它会面临以下挑战:
- 数据结构混淆:无法清晰理解嵌套对象(如metadata、attributes)的内部结构
- 字段含义不明:不知道”availability”字段的可能值及其含义
- 信息优先级不清:难以判断哪些信息对用户最重要
- 上下文窗口占用:大量原始JSON占用了LLM的上下文窗口,挤压了其他重要信息
这些问题可能导致LLM产生以下错误理解:
- 混淆产品主体与变体信息:“这款手表有黑色、银色和玫瑰金三种颜色,价格分别是899元、899元和949元。“(误将变体信息作为主要信息)
- 错误关联技术细节:“这款TechFit Pro智能手表的保修期是TF-SW-P10。“(混淆SKU与保修期)
- 基于不完整信息生成幻觉:“该手表在所有电子商店均有销售。“(基于shipping.locations错误推断)
4.2.2 人工调优后的配置
Higress 支持结合 go template 和 gjson 表达式来对请求和响应模版进行精细化处理(详细能力请查阅文档:https://higress.cn/en/ai/mcp-server),通过精心调优,我们可以将配置优化如下:
server:  name: ecommerce-apitools:  - name: searchProducts    description: "搜索电商平台上的产品,返回匹配搜索条件的产品列表,包含产品基本信息、价格、库存状态、评分等"    args:      - name: query        description: "搜索关键词,可以是产品名称、品牌、型号或描述中的关键词"        type: string        required: true      - name: category        description: "产品类别,例如'electronics'、'clothing'、'home'等"        type: string        required: false      - name: limit        description: "返回结果数量,范围1-50"        type: integer        minimum: 1        maximum: 50        default: 10    requestTemplate:      url: "https://api.example.com/products/search"      method: GET      argsToUrlParam: true    responseTemplate:      body: |        # 产品搜索结果
        找到 {{.total}} 个匹配"{{.query}}"的产品,以下是最相关的 {{len .products}} 个结果:
        {{range $index, $product := .products}}        ## {{add $index 1}}. {{$product.name}}
        **价格**: {{if $product.onSale}}~~{{$product.compareAtPrice}} {{$product.currency}}~~ **{{$product.price}} {{$product.currency}}** (节省 {{percentage $product.compareAtPrice $product.price}}%){{else}}{{$product.price}} {{$product.currency}}{{end}}
        **品牌**: {{$product.brand.name}}
        **库存状态**: {{if eq $product.availability "in_stock"}}有货{{else if eq $product.availability "low_stock"}}库存不多{{else}}缺货{{end}}
        {{if gt (len $product.ratings.reviews) 0}}**评分**: {{$product.ratings.averageRating}}/5 ({{$product.ratings.reviewCount}}条评价){{end}}
        {{$product.description | truncate 200 "..."}}
        {{if gt (len $product.highlights) 0}}**产品特点**:        {{range $highlight := $product.highlights}}        - {{$highlight}}        {{end}}{{end}}
        {{end}}
        {{if gt .total (len .products)}}        还有更多结果未显示,可以通过调整搜索条件获取更精准的匹配。        {{end}}
以下是一个智能手表产品的实际响应示例,展示了调优后的模板如何处理原始数据:
# 产品搜索结果
找到 128 个匹配"智能手表"的产品,以下是最相关的 10 个结果:
## 1. TechFit Pro 智能手表
**价格**: ~~1299 CNY~~ **899 CNY** (节省 30.8%)
**品牌**: TechFit
**库存状态**: 有货
**评分**: 4.7/5 (342条评价)
TechFit Pro智能手表配备高清彩色触摸屏,支持心率监测、血氧检测、多种运动模式追踪和睡眠分析。防水设计,续航可达7天。
**产品特点**:- 高清AMOLED触摸屏- 7天超长续航- 心率和血氧监测- 30种运动模式- 5ATM防水
## 2. FitBit Versa 3
**价格**: 1499 CNY
**品牌**: FitBit
**库存状态**: 有货
**评分**: 4.5/5 (287条评价)
FitBit Versa 3智能手表集成GPS定位,支持24/7心率监测,内置语音助手,可接听电话,电池续航可达6天。
**产品特点**:- 内置GPS- 语音助手功能- 来电接听- 20+运动模式- 防水50米
## 3. Apple Watch Series 7
**价格**: 2999 CNY
**品牌**: Apple
**库存状态**: 库存不多
**评分**: 4.9/5 (1243条评价)
Apple Watch Series 7拥有更大的显示屏,更快的充电速度,IP6X防尘认证,游泳级防水,全天候血氧监测和心电图功能。
**产品特点**:- 视网膜级OLED显示屏- 快速充电- 心电图和血氧监测- 跌倒检测和紧急SOS- 支持Apple Pay
还有更多结果未显示,可以通过调整搜索条件获取更精准的匹配。
通过这种结构化的响应格式,LLM可以清晰地理解每个产品的关键信息,而不会被大量的技术细节和原始JSON结构所困扰。
4.3 调优如何改善LLM理解
经过调优的配置能够显著提升LLM对数据的理解:
4.3.1 调优前LLM的理解问题
- 结构混淆:无法区分主产品与变体,可能错误地将变体属性描述为产品主要特征
- 关注错误重点:可能过度关注细节(如SKU、条形码)而非用户关心的产品特性
- 误解字段含义:无法正确理解专业术语和编码值
- 生成幻觉:被例如商品详情中的无关内容影响,导致产生幻觉
4.3.2 调优后LLM的理解改进
- 结构清晰:准确理解每个产品的基本信息、价格、品牌、库存状态和评分
- 重点突出:能识别价格折扣、产品描述和特点等关键信息
- 语义明确:正确理解库存状态的含义,不会产生歧义
- 上下文完整:了解搜索结果的全貌(“找到128个匹配项,显示10个”)
4.4 调优策略总结
基于上述案例,我们可以提炼出以下MCP配置调优策略:
- 识别并提取核心字段:分析用户真正需要的信息,去除技术细节和内部数据
- 转换专业术语:将技术代码和专业术语转换为让LLM易于理解的描述
- 添加上下文信息:帮助LLM理解数据的完整性和范围
- 结构化关键信息:使用层次结构让信息的重要性和关系一目了然
05 结语
OpenAPI to MCP工具为我们提供了快速将API转换为AI工具的能力,而人工调优则是提升AI理解和用户体验的关键一步。通过精心设计的响应模板,我们可以引导LLM更准确地理解API返回的数据,减少错误解读和幻觉,从而为用户提供更有价值的服务。
在实际应用中,建议先使用OpenAPI to MCP工具生成基础配置,然后根据API的复杂性和用户需求,有针对性地进行调优。对于简单API,自动生成的配置可能已经足够;而对于复杂API,特别是返回大量嵌套数据的API,人工调优将带来显著的体验提升。
需要强调的是,高质量的MCP配置调优往往需要依赖数据的反馈和迭代优化。单一的配置很难一次性满足所有用户场景,因此需要基于多配置版本的灰度测试,构建起评估反馈和持续优化的闭环。Higress将结合Nacos配置中心的强大能力,为MCP服务器的维护者提供更精细的配置管理功能,包括版本控制、灰度发布、配置回滚和效果分析等,让配置调优不再是一次性工作,而是一个数据驱动的持续优化过程。
通过”自动转换+人工调优+数据反馈”的完整链路,我们既能享受自动化带来的效率提升,又能确保AI助手提供高质量的用户体验,同时不断根据实际使用数据优化配置,使AI助手的能力随着使用而持续进化。
预告:Higress 将于下周上线国内首个基于 API 网关的 MCP Marketplace,包括 50 款精心调优过的 MCP 服务。
[1] https://github.com/higress-group/openapi-to-mcpserver
[2] https://mp.weixin.qq.com/s/bgDd82lj0jBUWifLMNByjw
[3] https://higress.cn/en/ai/mcp-quick-start/#configuring-rest-api-mcp-server


