Quick Start
Environment 1: Using Higress in K8s
Section titled “Environment 1: Using Higress in K8s”Stage 1: Installation
Section titled “Stage 1: Installation”Scenario 1: Using in a Standard K8s Cluster
Section titled “Scenario 1: Using in a Standard K8s Cluster”Helm Installation Command
helm repo add higress.io https://higress.io/helm-chartshelm install higress -n higress-system higress.io/higress --create-namespace --render-subchart-notesAll Higress Docker images use their own dedicated repository, unaffected by Docker Hub access limitations in certain regions
Obtain the LoadBalancer IP of Higress Gateway and record it. You can access the Higress Gateway through ports 80 and 443 of this IP.
kubectl get svc -n higress-system higress-gateway -o jsonpath='{.status.loadBalancer.ingress[0].ip}'Note
If you cannot obtain the LoadBalancer IP, it means your current K8s cluster does not support LoadBalancer type Services. Consider the following solutions:
- Use a cloud provider’s K8s service, such as Alibaba Cloud ACK
- Refer to the Operations Parameter Configuration and enable
higress-core.gateway.hostNetworkto make Higress listen on the host machine ports, then use other software/hardware load balancers to forward traffic to specific machine IPs - (Not recommended for production) Use the open-source load balancing solution MetalLB
Scenario 2: Using in a Local K8s Environment
Section titled “Scenario 2: Using in a Local K8s Environment”The following steps apply to all scenarios where you start a K8s cluster locally for verification. If you already have a test cluster configured locally, you can skip directly to Step 3 to install Higress.
Step 1: Install kubectl & kind
Section titled “Step 1: Install kubectl & kind”MacOS:
# for Intel Macs[ $(uname -m) = x86_64 ] && curl -LO "https://dl.k8s.io/release/$(curl -L -s https://dl.k8s.io/release/stable.txt)/bin/darwin/amd64/kubectl"[ $(uname -m) = x86_64 ] && curl -Lo ./kind https://kind.sigs.k8s.io/dl/v0.18.0/kind-darwin-amd64# for Apple Silicon Macs (M1/M2)[ $(uname -m) = arm64 ] && curl -LO "https://dl.k8s.io/release/$(curl -L -s https://dl.k8s.io/release/stable.txt)/bin/darwin/arm64/kubectl"[ $(uname -m) = arm64 ] && curl -Lo ./kind https://kind.sigs.k8s.io/dl/v0.18.0/kind-darwin-arm64chmod +x ./kubectl ./kindsudo mv ./kubectl ./kind /usr/local/binUsing PowerShell in Windows:
Download kubectl v1.27.1 and kind v0.18.0.
If you have curl installed locally, you can execute the following commands:
curl.exe -LO "https://dl.k8s.io/release/v1.27.1/bin/windows/amd64/kubectl.exe"curl.exe -Lo kind-windows-amd64.exe https://kind.sigs.k8s.io/dl/v0.18.0/kind-windows-amd64Note: To find out the latest stable version of
kubectl(for example, for scripting), check the content at https://dl.k8s.io/release/stable.txt.
Then rename the downloaded kind-windows-amd64 or kind-windows-amd64.exe to kind.exe, and move both kubectl.exe and kind.exe to a path included in your PATH environment variable.
Linux:
curl -LO "https://dl.k8s.io/release/$(curl -L -s https://dl.k8s.io/release/stable.txt)/bin/linux/amd64/kubectl"curl -Lo ./kind https://kind.sigs.k8s.io/dl/v0.18.0/kind-linux-amd64chmod +x ./kubectl ./kindsudo mv ./kubectl ./kind /usr/local/binStep 2: Create and Activate kind
Section titled “Step 2: Create and Activate kind”First, create a cluster configuration file: cluster.conf
# cluster.confkind: ClusterapiVersion: kind.x-k8s.io/v1alpha4# networking: # WARNING: It is _strongly_ recommended that you keep this the default # (127.0.0.1) for security reasons. However it is possible to change this. # apiServerAddress: "0.0.0.0" # By default the API server listens on a random open port. # You may choose a specific port but probably don't need to in most cases. # Using a random port makes it easier to spin up multiple clusters. # apiServerPort: 6443nodes:- role: control-plane kubeadmConfigPatches: - | kind: InitConfiguration nodeRegistration: kubeletExtraArgs: node-labels: "ingress-ready=true" extraPortMappings: - containerPort: 80 hostPort: 80 protocol: TCP - containerPort: 443 hostPort: 443 protocol: TCPFor Mac & Linux systems, execute:
kind create cluster --name higress --config=cluster.confkubectl config use-context kind-higressFor Windows systems, execute:
kind.exe create cluster --name higress --config=cluster.confkubectl.exe config use-context kind-higressNote
The above configuration is to use the local (127.0.0.1) ports 80 and 443 for Higress access.
Step 3: Install Higress
Section titled “Step 3: Install Higress”Local installation flag: --set global.local=true
helm repo add higress.io https://higress.io/helm-chartshelm install higress -n higress-system higress.io/higress --create-namespace --render-subchart-notes --set global.local=true --set global.o11y.enabled=falseIf you want to enable the built-in observability suite, please refer to the Deployment documentation.
After installation, you can access the Higress Gateway in the local cluster through local ports 80 and 443.
Note: If you are using an existing local K8s cluster, you may need to execute the command below to map the ports from the K8s cluster, and then try accessing the local ports.
kubectl port-forward service/higress-gateway -n higress-system 80:80 443:443Stage 2: Configuration
Section titled “Stage 2: Configuration”Assume that a service named foo has already been deployed in the default namespace, and we want to create a route corresponding to http://foo.bar.com/foo pointing to this service.
If needed, you can use the YAML below to create the corresponding test service.
kind: PodapiVersion: v1metadata: name: foo-app labels: app: foospec: containers: - name: foo-app image: higress-registry.cn-hangzhou.cr.aliyuncs.com/higress/http-echo:0.2.4-alpine args: - "-text=foo"---kind: ServiceapiVersion: v1metadata: name: foo-servicespec: selector: app: foo ports: # Default port used by the image - port: 5678Method 1: Configure Using Higress Console
Section titled “Method 1: Configure Using Higress Console”Use hgctl to open the console:
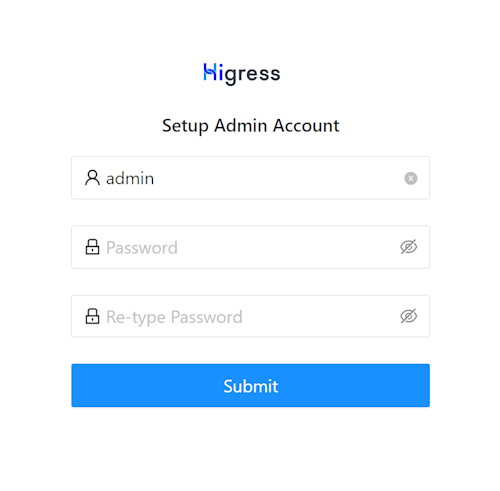
hgctl dashboard consoleYou need to initialize the administrator account on your first visit.
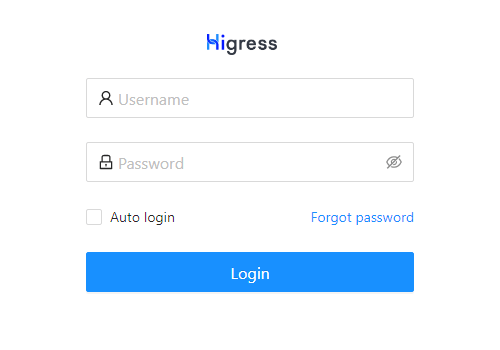
After initialization, the interface will automatically redirect to the login page. Please use the username and password you just set to log in to the Higress Console.
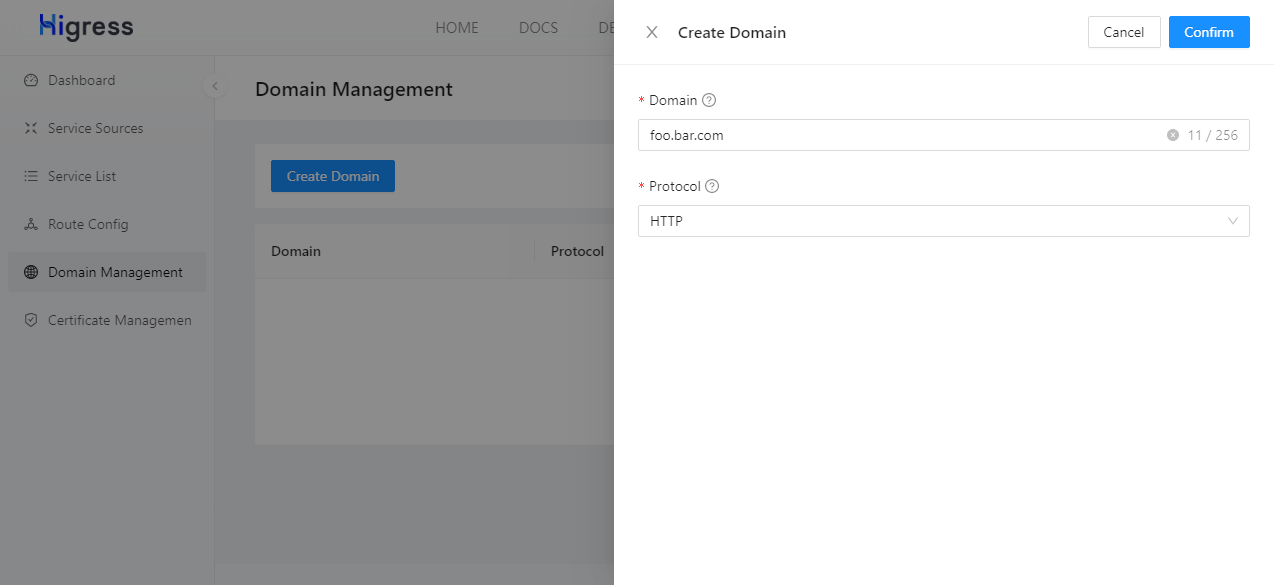
Click on “Domain Management” in the navigation bar on the left, then click the “Create Domain” button on the right side of the page. Fill in the form according to the image below and click the “Confirm” button.
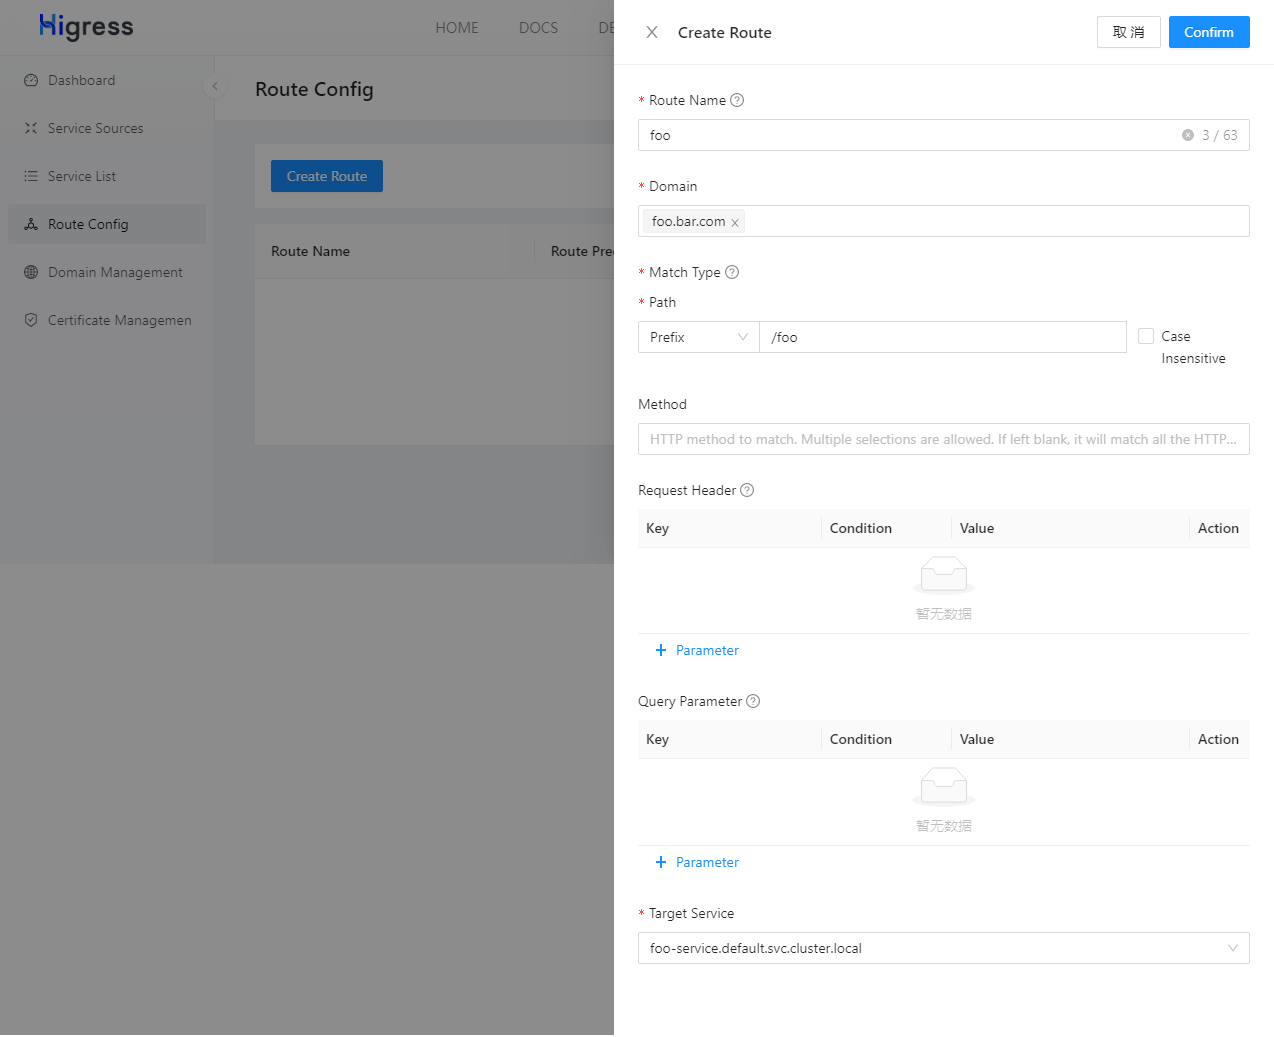
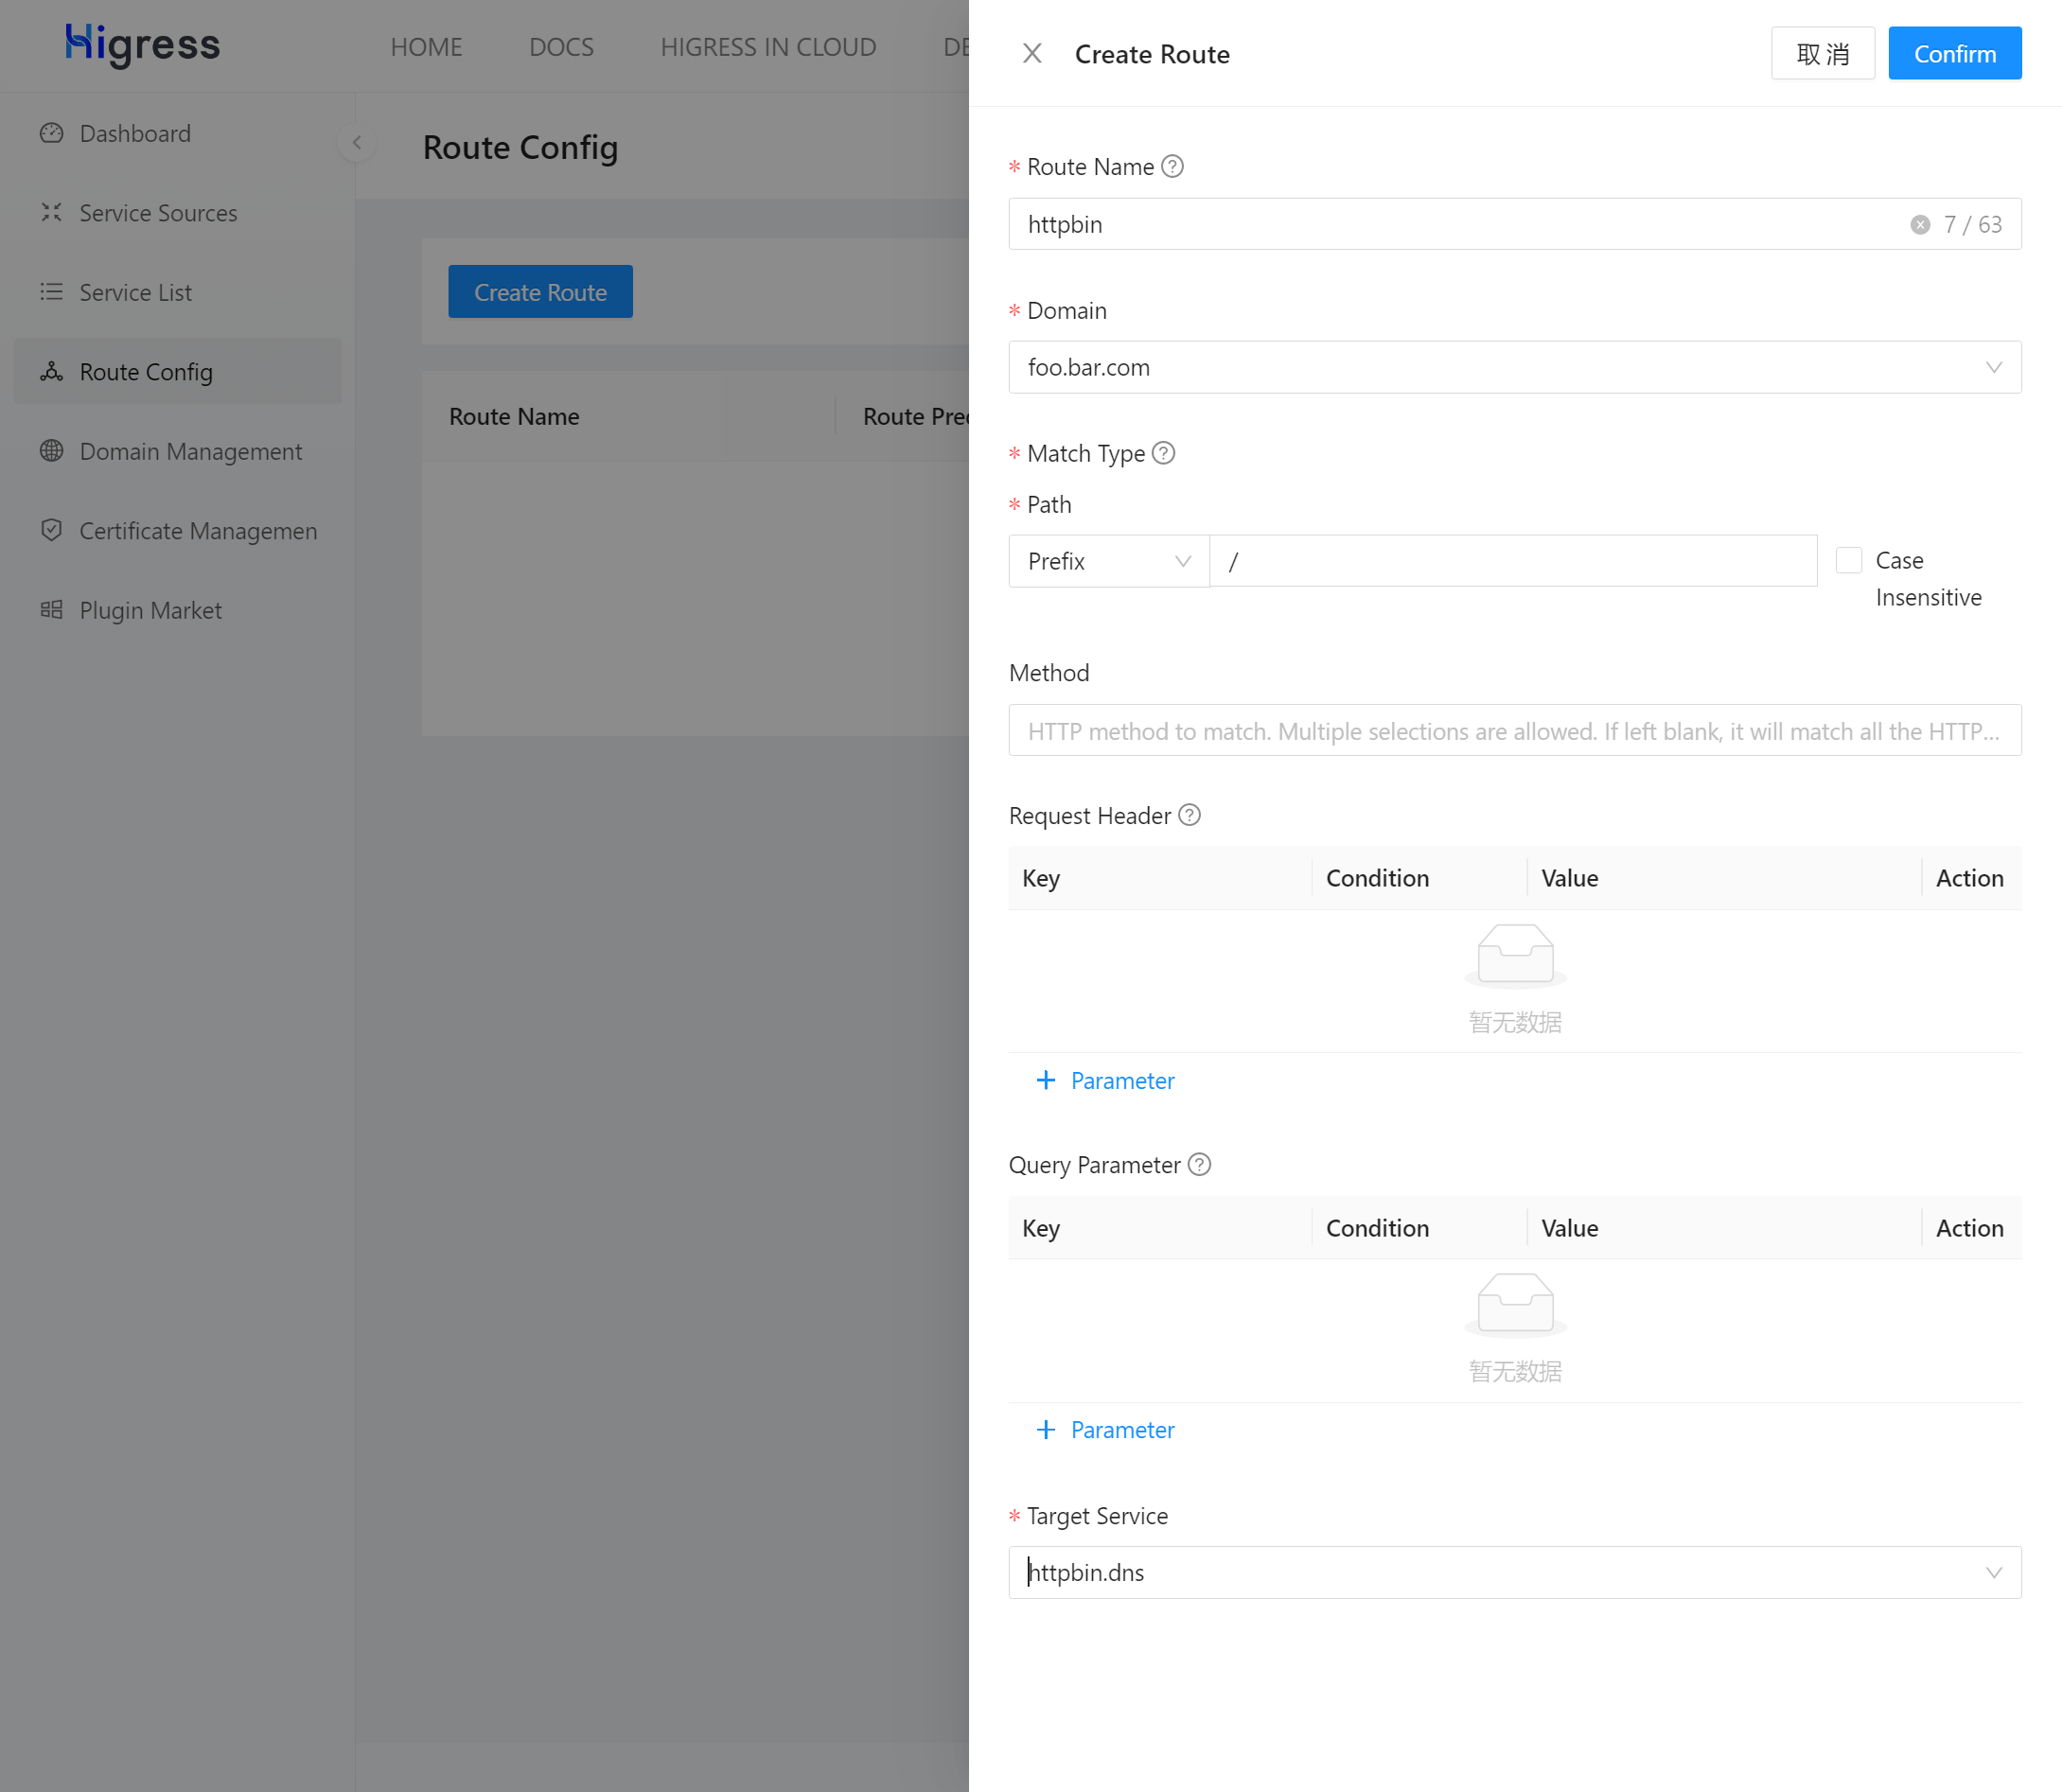
Click on “Route Management” in the navigation bar on the left, then click the “Create Route” button on the right side of the page. Fill in the form according to the image below and click the “Confirm” button.
Method 2: Configure Using Ingress CRD
Section titled “Method 2: Configure Using Ingress CRD”Use the YAML below to create the route configuration we need.
apiVersion: networking.k8s.io/v1kind: Ingressmetadata: name: foospec: ingressClassName: higress rules: - host: foo.bar.com http: paths: - pathType: Prefix path: "/foo" backend: service: name: foo-service port: number: 5678Stage 3: Request Validation
Section titled “Stage 3: Request Validation”Execute the following command to verify that the test route works properly:
# should output "foo"curl http://GatewayIP/foo -H 'host: foo.bar.com'Environment 2: Using Without K8s
Section titled “Environment 2: Using Without K8s”Stage 1: Installation
Section titled “Stage 1: Installation”If you are deploying in the cloud, the Enterprise Edition (no K8s required) is recommended for production environments. For development and testing, you can use the one-click deployment of the Community Edition below:

For local development, you can use a minimalist deployment method, using local files for configuration storage:
# Create a working directorymkdir higress; cd higress# Start higress, configuration files will be written to the working directorydocker run -d --rm --name higress-ai -v ${PWD}:/data -e O11Y=on \ -p 8001:8001 -p 8080:8080 -p 8443:8443 \ higress-registry.cn-hangzhou.cr.aliyuncs.com/higress/all-in-one:latestThe listening ports are explained as follows:
- Port 8001: Higress UI console entry
- Port 8080: Gateway HTTP protocol entry
- Port 8443: Gateway HTTPS protocol entry
Alternatively, you can use the following method to connect to Nacos for configuration storage:
curl -fsSL https://higress.io/standalone/get-higress.sh | bash -s -- -a -c nacos://192.168.0.1:8848 --nacos-username=nacos --nacos-password=nacosPlease replace 192.168.0.1 with the actual IP of the Nacos server (if Nacos is deployed locally, do not use loopback addresses like localhost or 127.0.0.1), and adjust the values of --nacos-username and --nacos-password as needed. If the Nacos service has not enabled authentication, you can remove these two parameters.
Stage 2: Configuration
Section titled “Stage 2: Configuration”Access the Higress Console. You need to initialize the administrator account on your first visit.
After initialization, the interface will automatically redirect to the login page. Please use the username and password you just set to log in to the Higress Console.
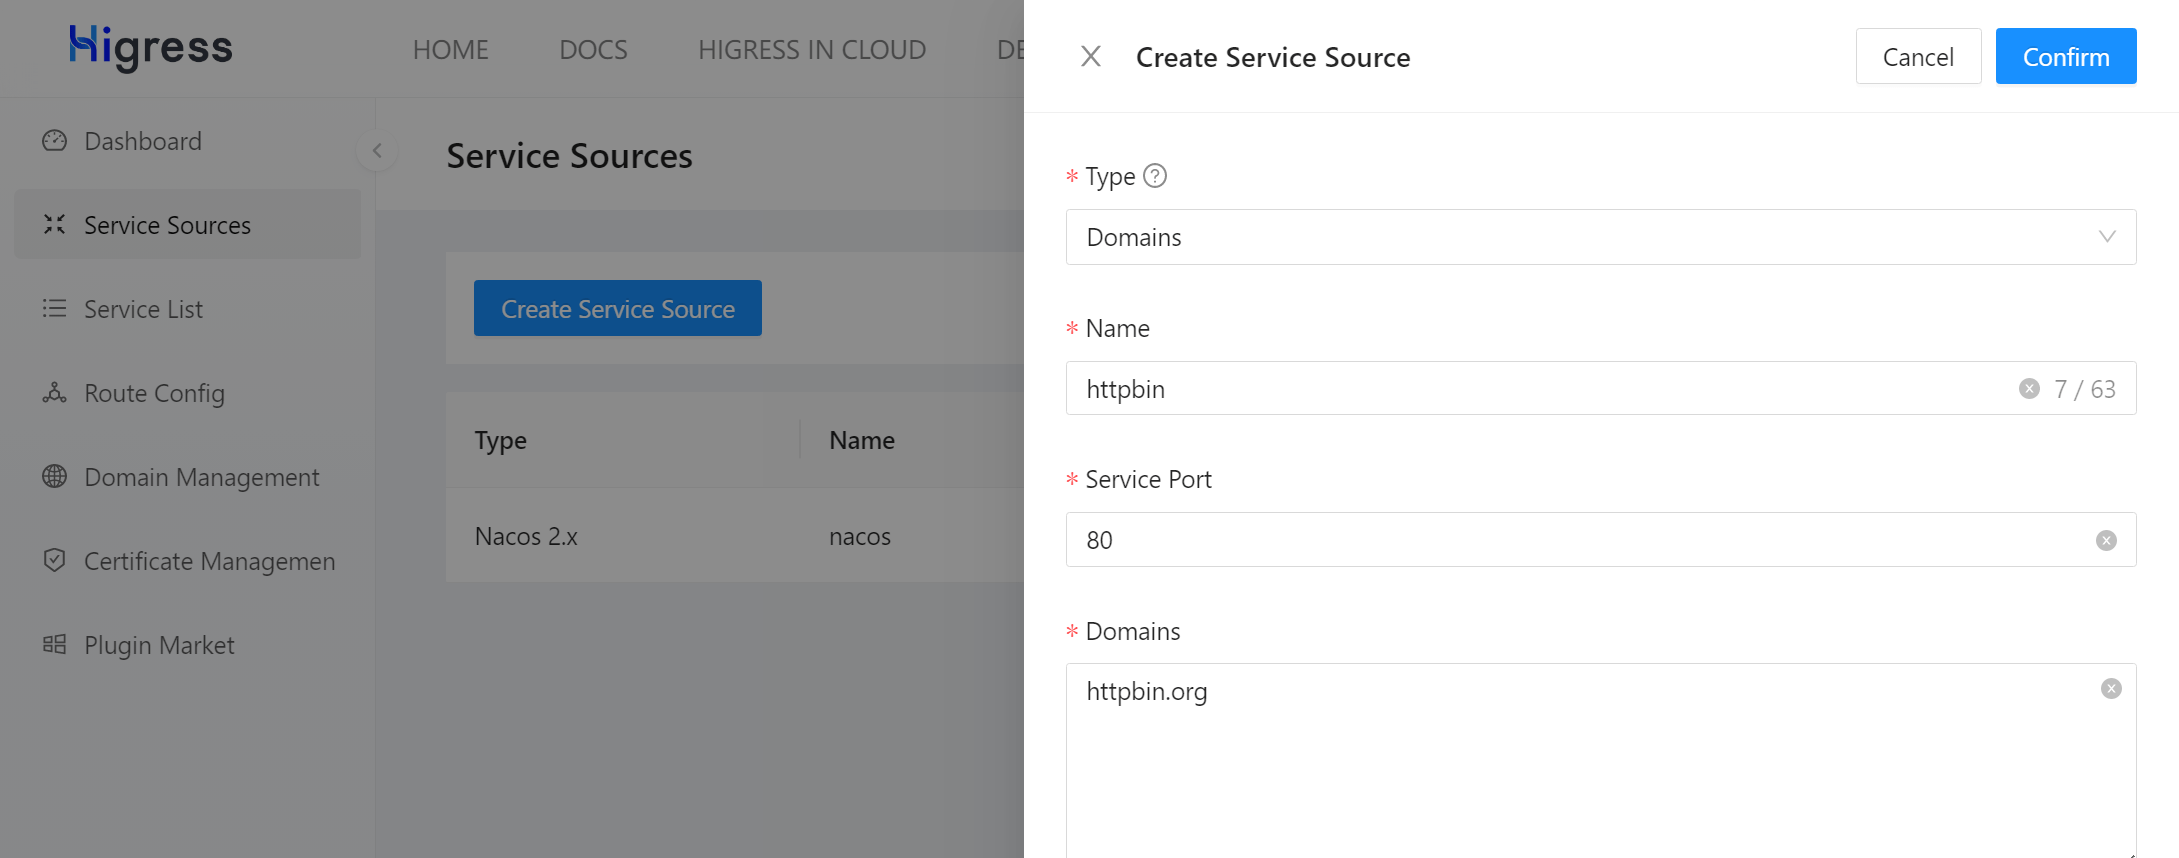
Click on “Service Sources” in the navigation bar on the left, then click the “Create Service Source” button on the right side of the page. Fill in the form according to the image below and click the “Confirm” button.
Click on “Domain Management” in the navigation bar on the left, then click the “Create Domain” button on the right side of the page. Fill in the form according to the image below and click the “Confirm” button.
Click on “Route Management” in the navigation bar on the left, then click the “Create Route” button on the right side of the page. Fill in the form according to the image below and click the “Confirm” button.
Stage 3: Request Validation
Section titled “Stage 3: Request Validation”Execute the following command to verify that the test route works properly:
# should output a JSON object containing request datacurl http://localhost/get?foo=bar -H 'host: foo.bar.com'